QUI SOMMES NOUS ?
Inanix conçoit des drones civils professionnels homologués pour répondre à vos besoins spécifiques.
Notre équipe pluridisciplinaire vous accompagne dans les phases de définition du besoin, l’étude de faisabilité, l’intégration des charges utiles et de drones dans votre système d’information.
Votre drone sera développé à partir d’une architecture déjà éprouvée, principalement basée sur des technologies Open-Source et notre Solution logicielle d’automatisation et d’interconnexion de drones : l’Alfonce Gateway.
Donc si vous ne trouvez pas le drone qui répond à votre besoin, n’hésitez pas à nous contacter.
NOTRE MISSION
« Inventer les drones de demain »
Simples
Les drones se doivent d’être simples aussi bien dans leur mise en œuvre que dans leur utilisation au quotidien

Interconnectés
Les drones doivent pouvoir s’interconnecter entre eux, mais aussi avec n’importe quel système d’information

Automatisés
les taches remplies par le drone doivent être le plus possible automatisées pour faciliter l’accès à cette technologie
NOS VALEURS
Innovation
L’innovation est au cœur de notre métier, nous sommes en permanence à la recherche de nouvelles idées d’usage de drone innovant. L’objectif, réinventer le monde de demain grâce à des drones uniques et ingénieux.
Respect
Il est très important pour nous de créer un drone adapté à l’usage des besoins du client. C’est pour cela que nous plaçons au centre de notre intérêt l’écoute et le respect des demandes de nos clients afin de créer un drone qui leur ressemble.
Expertise
Nous visons l’excellence en toutes circonstances, pour satisfaire au mieux nos clients. Nous nous impliquons entièrement pour que les projets de nos clients soient optimaux de A à Z, ainsi que dans le suivi post réalisation.
NOS SAVOIR-FAIRE
Bureau d’étude

Nous sommes en permanence à la recherche de nouvelles idées pour des usages innovants des drones. Notre expérience en prototypage électronique, à base de modules Arduino et/ou Raspberry Pi, nous permet de concevoir et de réaliser des montages complexes mêlant électronique et informatique, ainsi que le développement logiciel.
Unités de fabrication

Inanix conçoit, assemble et commercialise ses propres drones, en France et plus précisément à Rennes, en Bretagne. Tous nos drones et accessoires sont conçus autant que possible dans le respect des standards et sur des technologies Open Source. Cela permet de limiter nos coûts de production et de vous garantir, un accompagnement client et une maintenance aisée.
Logiciel

Grâce à notre logiciel d’automatisation et d’interconnexion au drones, l’Alfonce Gateway, nous sommes en mesure de mettre en oeuvre des fonctionnalités avancées dans les drones : Intelligence Artificielle (IA), suivi de cibles visuelles, contrôle d’essaims de drones, lecture des codes.
Notre savoir est complété par la capacité de produire des interface utilisateurs spécifiques et l’adaptation du firmware Ardupilot
NOS RÉALISATIONS
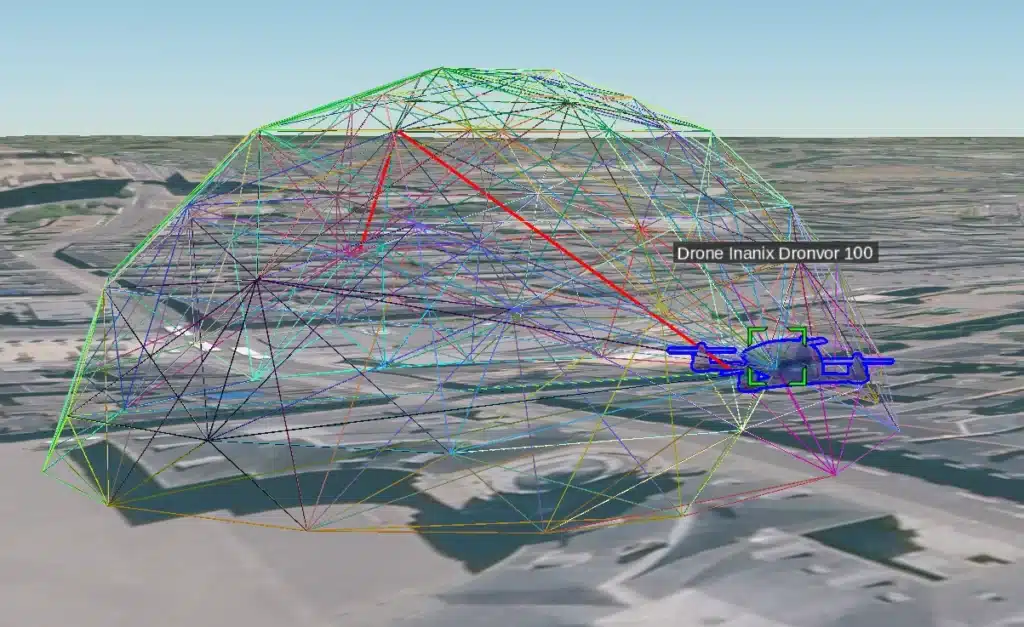
DRONVOR
Le drone Dronvor est adapté pour une utilisation en mer. Il est le premier drone conçu spécialement pour être utilisé en pleine mer et résister à des conditions de course. Le drone assure une sécurité maximale du skipper, de l’équipement du bateau ainsi que du drone lui-même. Quiconque, pilote de drone expérimenté ou non peut ainsi profiter d’un drone facile d’utilisation et filmer des images exceptionnelles en pleine mer.

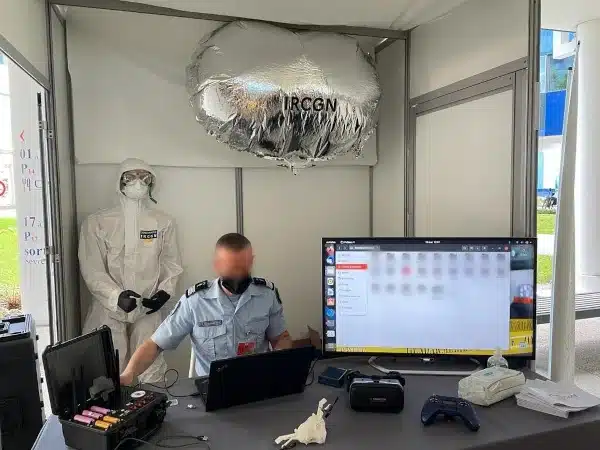
HANGI
Le drone HANGI est le premier drone à reconnaissance de scène de crime. La caractéristique première du drone est qu’il n’émet pas de turbulence ou de flux d’air vers le sol et préserve ainsi la scène de crime grâce à son système de ballon d’hélium. Développé avec l’IRCGN (Institut de Recherche Criminelle de la Gendarmerie Nationale), le drone HANGI a été récompensé du prix de l’Audace 2021.
ALFONCE GATEWAY
L’Alfonce Gateway est une plateforme logicielle d’interconnexion et d’automatisation des drones, charges utiles et système d’information.
Mutli-drones et multi-utilisateurs, elle est totalement agnostique en terme de technologie et peut donc s’adapter aux drones de toutes les marques.
De nombreux algorithmes sont déjà implémentés, nous pouvons aussi entièrement personnaliser la solutions pour vos besoins.
AUTRES RÉALISATIONS
 Alfonce H960 – Drone Homologué S1 et S2 12kg : hexacopter (6 moteurs) homologué par la DGAC pour les scénarios de vol équipé en standard de : GPS, Lidar, mini caméra, télémétrie, télécommande Radiolink


")
")
ACTUALITÉS


Table ronde Imagine Summit : « DGA : LES NOUVELLES TECHNOLOGIES SUR TOUS LES FRONTS »
Inanix était présent à la table ronde de l’Imagine Summit : « DGA : LES NOUVELLES TECHNOLOGIES SUR TOUS LES FRONTS » Nous avons pu échanger sur les thèmes des drones bien entendu en présentant nos travaux sur le drone HANGI et le Dronvor, mais aussi innovation vertueuse et sobriété énergétique, en compagnie de la DGA (Pole […]

Imagine Summit à Rennes
Retrouvez nous au ImagineSummit jeudi prochain (7/12) au Le Couvent des Jacobins pour parler innovation, défense et bien entendu drones, en compagnie de la DGA – Direction générale de l’armement, du pôle Images & Réseaux et du Le Poool https://www.imagine-summit.tech/fr/programme-sessions/dga-les-nouvelles-technologies-sur-tous-les-fronts

Salon Milipol Paris 2023
On vous attend nombreux au salon Milipol Paris qui se tient jusqu’à vendredi 17 novembre au parc des expositions de Villepinte Paris Nord. Nous présentons notre nouvelle version du drone HANGI, encore plus petite que la version précédente ! Rendez vous sur le stand de la Région Bretagne, Hall 5 stand F147

Salon Milipol Paris 2023
Nous serons présent au salon Milipol Paris qui se déroulera au Parc des Expositions Paris Nord Villepinte du 14 au 17 Novembre 2023. Nous y présenterons notre nouvelle version du drone HANGI, le drone indoor de reconnaissance de scènes de crime développé en partenariat avec la Gendarmerie Nationale. Cette version est plus petite, plus packagée, […]

Escape Game de la rentrée
La semaine dernière nous avons effectué notre traditionnel #EscapeGame de la rentrée chez Get Out Rennes. Moment convivial de #cohésion garanti, qui en plus permet de booster la communication interne. Malgré un début timide, nous avons réussi à résoudre les énigmes et à sortir en 56 minutes et 10 secondes ! Merci à Get Out […]

Open de l’Industrie
On vous attend nombreux à l’Open de l’Industrie à Carhaix organisé par le Breizh Fab. Nous participons au concours Crisalide Industrie et nous exposons notre Dronvor. Une journée organisée sans aucune faille et très riche en rencontre !

Clap de fin pour le Cannes Yachting Festival
Clap de fin pour le Cannes Yachting Festival 2023. Nous avons eu, une nouvelle fois, énormément de très bons retours sur le Dronvor, notre drone a destination du nautisme. Merci au Cannes Yachting Festival, à Mer Angels et à BNP Paribas Banque Privée pour l’organisation du sans faille.

Ouverture du Cannes Yachting Festival
Le Cannes Yachting Festival a ouvert ses portes ce matin. Nous sommes en place au Startup Village jusqu’à dimanche ! Venez y découvrir notre drone étanche, flottant et automatisé pour un usage nautique : le Dronvor Un grands merci aux organisateurs :

Retrouvez nous au Cannes Yachting Festival
Le Cannes Yachting Festival ouvre ses portes dans une semaine, le mardi 12 septembre. Venez y découvrir le prototype du Dronvor, le premier drone a destination du nautisme et de la #plaisance, sur l’espace Start-up village (stand SAIL104BIS) à Port CANTO. ? Il nous reste quelques places de disponible, alors n’hésitez pas à nous contacter !

Gwendal arrive en renfort!
Bienvenue à Gwendal Mingant qui rejoint aujourd’hui la team d’Inanix pour nous assister dans la conception de nos drones. Gwendal Mingant en quelques mots :« Je viens de finir mon BTS Systèmes Numériques option informatique et réseaux. Passionné par le milieu des drones mais aussi par le milieu maritime, j’ai rejoins l’équipe d’Inanix dans le cadre de mon alternance en […]

Podcast Safety Innov
Guilain YVON a interviewé notre CEO Aurélien TRICAULT dans le cadre de ses Podcast hebdomadaires. Les thèmes abordés tournent principalement autours du drone HANGI car Guilain est aussi le CEO de LIUM, une société française qui conçoit un ballon captif pour la surveillance de sites sensibles. Mais ils abordent aussi le drone Dronvor mais aussi […]

Inanix est invité à exposer ses produits au Challenge Drones M-I, par le COMSIC de l’Armée de Terre
Merci au COMSIC de l’Armée de Terre pour son invitation à exposer nos produits lors de l’organisation du Challenge Drones M-I, en compagnie des entreprises HEXADRONE et PRYNTEC. Nous avons bien entendu exposé nos drones HANGI et Dronvor, mais aussi réalisé une démonstration d’interconnexion de drones et rovers. Il s’agit toujours de très belles opportunités de confronter nos produits, nos solutions et nos […]

La remise des prix du challenge CoHoMa organisé par le Battle Lab Terre et l’Agence de l’Innovation Défense
Ce 26 juin 2023 se déroulait la remise des prix du Challenge CoHoMa 2, organisé par le BLT avec le soutien de l’Agence de l’innovation de défense dans le magnifique Cercle National des Armées place Saint-Augustin à Paris. Bien que tout n’ait pas fonctionné de manière optimale durant la restitution du challenge, avec en autre de gros problèmes de liaison radio, […]

Merci à TV Rennes pour sa visite sur notre stand et la mise en avant des drones Inanix
Nous avons reçu la visite de TVR sur le stand de la Région Bretagne au International Paris Air Show. Merci à la chaîne pour sa belle mise en avant d’Inanix et de nos 2 drones exposés :➡ Le Dronvor, notre drone destiné à la course au large et à la plaisance➡ HANGI, notre drone de reconnaissance de scènes de […]

La visite de Laurence Fortin L’Hour sur notre stand au International Paris Air Show
Merci à Laurence Fortin L’Hour (vice-présidente territoires, économie et habitat de la Région Bretagne) d’avoir pris le temps de visiter notre stand au International Paris Air Show. BRETAGNE AEROSPACE – Aerospace & Defence Cluster – BretagneBretagne Commerce International#drone#Dronvor#HANGI

